- Feb 24, 2023
- 250
- 153
- 111
chad4j's PAC3 Tutorial
Hi! This is my tutorial for a lot of the stuff I've been screensharing over the last few days in order to help people learn PAC3. A lot of this is covered already in a tutorial by Enzo which is incredibly made, the link to it will be at the bottom with all the resources I will tag. This will cover setting up your pac3 for optimal editing, adding models, using custom files, and editing specific entities.
1.0 Recommended PAC3 setup
Precurser note: I will be referring to two panes a lot through this tutorial, one I will refer to as the "pieces view" and the "charactaristics view".1.1 Understanding the aspects of PAC
What is PAC?PAC3 Is a Mod that was made for GMOD in order for people to customise their player / character appearance. It is available in the server for 800vpoints in the donate tab, and is an excellent way to add lore and or more "character" to your character!
I have PAC3 but, how do I access it? PAC3 is available by holding C once in GMOD and on your desire character, and clicking the pink "PAC3" icon on the left side of your screen.
Do I need approval for my PAC3?Most of the time you wont, but if you are ever unsure please check: https://www.civilgamers.com/community/threads/scp-rp-rules.2244/ Section 5.0 PAC3 Editor Rules
1.2 Setting up your PAC3 Model for editing
Setting up a edit-able character in PAC3 is relatively simple and straight forward.
Upon opening PAC3 for the first time, this is all you will see. The left image depicting the "pieces view" and the right depicting the "charactaristic view"
You cannot do much with this, so you want to go ahead and do the following:
Right click on "my outfit" in the pieces view and add an entity, this will then expand different areas as shown below.

As for the characterisation view, this will espand massively.

This is perfect for if you'd like to adjust the base model without any external changes. I will go through this in section 3.
Next add a bone in the at the minimum. This will help with a lot of the modifications you may make.

This will default the bone to head.
1.3 Advanced Set-Up (Optional)
This is optional, but it is further additions to the bones. I typically group these for organisation, and this part of the tutorial will be rather short as it is entirely optional to do.You change the bone as so on the left image, and the right shows how I like my set-up to be before editing.


2.0 Models / Character Accessories


In order to add a model, you do as shown above. In the pieces view, right click and add a model to your entity. This will spawn as a great big circle at first, so what you will want to do is as follows: In the charctaristics view under generic, click the three dots next to "model", this will open a large menu of downloaded assets that you can add in, here I go through and find a random party hat. It will spawn strangely, and likely facing to the left, you will want to adjust its placement by using the three coloured lines, or move it as a whole with the yellow centre dot. You may also need to adjust sizes, this is done by going to "orientation" and then size, and adjusting as needed. In this example I change the party hat to a size 0.5


3.0 Entity Editing
For editing your entity, there are two sections of key note within the characterisation view of note. Submaterials, and bodygroups.3.1 Submaterials
Submaterials are the textures in which you can alter the outward appereance of pieces of your character. Theres a menu on the three dots on the end, or you can enter paths you already know. For transparent textures I recommend 'swarm/particles/animglow_particle01'.3.2 Body Groups
Body groups is relatively straight forward. 0 is the default value, and what is enabled or disabled. 1 can change it to another model, or get rid of it, and this increases until the set number cap for each.3.3 Size Changes
In the orientation category, the size allows you to change the overall size of your model/entity. Server rules dictate that for the height changes, this needs to stay between 1-1.1, make sure this is on the main entity you spawn during set up. You can change individual sizes on things too.4.0 Custom File Hosting
Important thing of note: The server restricts any custom textures over 15mb sizes. Please keep this in mind when trying to use models. I will link a tutorial on how to decrease the files in the resources section.4.1 Tools
https://developer.valvesoftware.com/wiki/VTFEdit - Allows to edit the "Valve texture files" these are what the textures the model brings with ithttps://github.com/WilliamVenner/gmpublisher - Allows for extracting the models.
With both of these tools you're pretty-much set for importing any pac3.
4.2 Finding a Model
So, finding a model is hard in GMOD, but filtering by model should help. So for example, say I want to look like Johnny Silverhand from Cyberpunk, this is how my Steam UI would look:Steam Model Set up
4.3 Exporting a Model
Exporting a model using GMPublisher is relatively simple:1. Open GMPublisher.
2. Click the tab called "Installed Addons"
3. Find your model and click it, and then "extract model". I recommend your location being downloads.
4. Next, you want to delete the folder "lua" and the file "addons.json" as they cause the zip to break when made.
5. So, as mentioned prior: files must be under 15mb. So make sure you check the folder size. If it is under 15mb its good to go.
6. If it is over 15mb, you will want to click through the entire materials directory and find the vtf files.
7. Double click the VTF file- this will open VTFEdit. In this, you want to click Tools -> Convert folder
8. Firstly, select your directory of the model you've downloaded on 'input' and 'output' folder.
9. Press "Convert to TGA" and ensure "auto-create VMT files" is selected.
10. Press "Options" and ensure the maximum height and width are set lower than the current (512x512 is a good default)
11. Press "OK" and then "Convert"
12. Once this has ran, click "to VTF" and then "Convert"
13. Once this has ran, go to the material folder you just ran this on and delete any "TGA" file you find.
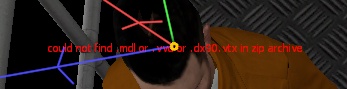
14. Check if this makes the folder below 15mb. And keep doing this if not, but also ensure: In the "Models" folder, there is only one model. This model will contain 6 files: a dx80.vtx, a dx90.vtx, a .mdl, a .phy, a sw.vtx and a .vvd. If it has more, you need to determine which playermodel you want/need. If the model does not contain all 6 files listed above, most of the time it **Will NOT** work on the server.
Once this is done and you have the model, please follow the following PAC3 tutorial on how to host it:
https://wiki.pac3.info/tutorial/hosting.
After this, add it to the model, the entity or whatever you require!
5.0 Resources
Civil Gamers Rules: https://www.civilgamers.com/community/threads/scp-rp-rules.2244/Enzo's Awesome Pac3 Tutorial: https://www.civilgamers.com/community/threads/enzos-pac3-basics-tutorial.8449/
Pac3 Custom Hosting Textures: https://wiki.pac3.info/tutorial/hosting
Reducing Pac3 file sizes: https://docs.google.com/document/d/13Ry8BlVUG4sErkqO_RYJ_FpSwL5SUMWyX46yBDzEe0I/edit
Animations:
Cheese's Pac Workshop: https://sites.google.com/view/cheese-pac-stuff/home?authuser=0
Useful PAC3 files: (will add more in future)
PAC3 - Toggle off PAC3 (Worth noting: this needs to be pasted into your pac above everything in the tree. IT WILL NOT DISABLE A CUSTOM ENTITY)
Last edited:

")
 Content Team


 Donator