Hello, PAC3 user.
You may already know that you think PAC3 is cool, but you want to get in the serious business and actually import it, you look into options and you read that github.com is the best website for this, you first look into github and you go "What in the actual fucking hell is this".
So in today's guide, I will be teaching you step by step on how to import a model and a material (texture) to github.
So in today's guide, I will be teaching you step by step on how to import a model and a material (texture) to github.
Importing custom modelsSo you pick your custom model from the workshop or create your own, then you finally optimize it to be below 15mb under server PAC3 requirements, and you want to host it, here's how to host it via github;
1. Create an account (easiest step).
2. Create your own repository and name it pac3import or anything that you would like.
3. Make sure that your repository is public, or it won't work on the server.
4. Upload your model under a .zip file, for this I recommend (should use) use 7zip with the following settings:
Archive format: zip
Compression method: 0 - Store
Then accept it and your folder should now appear as a .zip.
5. After making sure that your .zip is still below 15mb, you go to add file -> upload file -> and upload your zip into your repository.
6. When uploaded, you may be wondering on how you actually put this on your PAC in the server, however, It is very simple and this is how you do it:
- You go into the zip on your repository, right click on view raw and press copy link address.
When done, it should look like this:
https://github.com/......./....../raw/refs/heads/master/...........zip
And not like this:
https://github.com/......../......./blob/master/........zip
7. After doing all of this, it should work! Go into your game, PAC-3 menu, create a model, and under "model" you place the link that you copied, following the steps above.
Importing textures
I am adding this part to the guide under github as-well because as you may know, Network Leadership has decided to "ban" imgur imports to the server's PAC-3 due to issues with Imgur blocking the United Kingdom and most of you are not familiar with texture/material via github. Some steps will be taken from above.
1. Create an account
2. Create your own repository and name it pac3import or anything that you would like.
3. Make sure that your repository is public, or it won't work on the server.
4. You upload a file (preferably .png or .vtf).
5. After uploading, you do the same step that you did with custom models, but this time you right click on the image and press copy link address.
Here's how it should look like:
And not like this:
6. This time, you use a material and you create the material under your model (or entity, depending on what you're doing), name it something like "Uppertorso" and insert the link via basetexture.
If you are using a custom model and doing it's texture this way, don't forget to name the sub-materials in your model as the material that you are doing.
For example;
You import a suit model, but you want to import the textures separately, you would add the material under the custom imported model, and name the material like "suitsheet" with the basetexture inserted, so you would go into your model's sub-material list and find "Suit Sheet", and naming it "suitsheet".
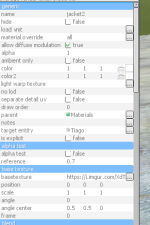
Take for example from this imported model:
This is a sub-material from the model named "jacket2" because the respective texture is named jacket2.

Conclusion of this guide
This is still considerably a work in progress guide, I have not added on how to actually import a model, just how to import it to github, with this. I might also have missed some steps, just let me know below in the guide if you would like anything added/anything I missed so I can edit the post... I will be listing down some guides that actually guide you on how to use tools like gmpublisher and how to properly import a model:
Athena's PAC-3 Tutorial
Napoleon's PAC-3 Guide (5 minute video)
Last edited:

 Game Master
 Donator
 Resources Team